
Juiceflow - AWS
Introduction
Juiceflow combines JuiceFS and Nextflow on MMCloud, offering a powerful, scalable solution for managing and executing workflows in the cloud.
Expand for more details on JuiceFS
JuiceFS is an open-source, high-performance distributed file system designed specifically for cloud environments. It offers unique features, such as:
- Separation of Data and Metadata: JuiceFS stores files in chunks within object storage like Amazon S3, while metadata can be stored in various databases, including Redis.
- Performance: Achieves millisecond-level latency and nearly unlimited throughput, depending on the object storage scale.
- Easy Integration with MMCloud: MMCloud provides pre-configured nextflow head node templates with JuiceFS setup, simplifying deployment.
- Comparison with S3FS: For a detailed comparison between JuiceFS and S3FS, see JuiceFS vs. S3FS. JuiceFS typically offers better performance and scalability.
Pre-requisites
- A VPC Security Group with inbound-rule for port
6868.- Navigation:
AWS EC2 console -> Network & Security -> Security Groups
- Navigation:

Inbound rules should include:
- Custom TCP over TCP on port6868, used by the Redis server in this juiceflow setup.
- AWS S3 buckets for Nextflow work and output directories.
- AWS S3 access, secret keys & MMC OpCenter Credentials stored as float secrets
Overview of the Setup
This solution leverages two scripts:
transient_JFS_AWS.sh: Formats the work directory S3 bucket to JuiceFS format.hostTerminate_AWS.sh: Allows for graceful exit of workflow from nextflow head-nodejob_submit_AWS.sh: Contains Nextflow input parameters and MMC config.
Steps
Download Scripts
- Host-init script (you don't have to edit this script, but you'll need it later)
wget https://mmce-data.s3.amazonaws.com/juiceflow/v1/aws/transient_JFS_AWS.sh- Host-terminate script (you don't have to edit this script, but you'll need it later)
wget https://mmce-data.s3.amazonaws.com/juiceflow/v1/aws/hostTerminate_AWS.sh- Job-submit script (Download the template or create one locally based on the template below with your Nextflow inputs and run configurations)
wget https://mmce-data.s3.amazonaws.com/juiceflow/v1/aws/job_submit_AWS.shExpand to view a sample `job_submit_AWS.sh` script
#!/bin/bash

# ---- User Configuration Section ----
# These configurations must be set by the user before running the script.

# ---- Optional Configuration Section ----
# These configurations are optional and can be customized as needed.

# JFS (JuiceFS) Private IP: Retrieved from the WORKER_ADDR environment variable.
jfs_private_ip=$(echo $WORKER_ADDR)

# Work Directory: Defines the root directory for working files. Optional suffix can be added.
workDir_suffix=''
workDir='/mnt/jfs/'$workDir_suffix
mkdir -p $workDir  # Ensures the working directory exists.
cd $workDir  # Changes to the working directory.
export NXF_HOME=$workDir  # Sets the NXF_HOME environment variable to the working directory.

# ------------------------------------------
# ---- vvv DO NOT EDIT THIS SECTION vvv ----
# ------------------------------------------

function install_float {
  # Install float
  local address=$(echo "$FLOAT_ADDR" | cut -d':' -f1)
  wget https://$address/float --no-check-certificate --quiet
  chmod +x float
}

function get_secret {
  input_string=$1
  local address=$(echo "$FLOAT_ADDR" | cut -d':' -f1)
  secret_value=$(./float secret get $input_string -a $address)
  if [[ $? -eq 0 ]]; then
    # Have this secret, will use the secret value
    echo $secret_value
    return
  else
    # Don't have this secret, will still use the input string
    echo $1
  fi
}

# Set Opcenter credentials
install_float
access_key=$(get_secret AWS_BUCKET_ACCESS_KEY)
secret_key=$(get_secret AWS_BUCKET_SECRET_KEY)
export AWS_ACCESS_KEY_ID=$access_key
export AWS_SECRET_ACCESS_KEY=$secret_key

opcenter_ip_address=$(get_secret OPCENTER_IP_ADDRESS)
opcenter_username=$(get_secret OPCENTER_USERNAME)
opcenter_password=$(get_secret OPCENTER_PASSWORD)

# ------------------------------------------
# ---- ^^^ DO NOT EDIT THIS SECTION ^^^ ----
# ------------------------------------------

# ---- Nextflow Configuration File Creation ----
# This section creates a Nextflow configuration file with various settings for the pipeline execution.

# Use cat to create or overwrite the mmc.config file with the desired Nextflow configurations.
# NOTE: S3 keys and OpCenter information will be concatted to the end of the config file. No need to add them now

# Additionally, please add your STAGE MOUNT BUCKETS here
cat > mmc.config << EOF
// enable nf-float plugin.
plugins {
    id 'nf-float'
}

// Process settings: Executor, error strategy, and resource allocation specifics.
process {
    executor = 'float'
    errorStrategy = 'retry'
    extra = '--dataVolume [opts=" --cache-dir /mnt/jfs_cache "]jfs://${jfs_private_ip}:6868/1:/mnt/jfs --dataVolume [size=120]:/mnt/jfs_cache --vmPolicy [spotOnly=true,retryLimit=10,retryInterval=300s]'
}

// Directories for Nextflow execution.
workDir = '${workDir}'
launchDir = '${workDir}'

// OpCenter connection settings.
float {
    address = '${opcenter_ip_address}'
    username = '${opcenter_username}'
    password = '${opcenter_password}'
}

// AWS S3 Client configuration.
aws {
  client {
    maxConnections = 20
    connectionTimeout = 300000
  }
  accessKey = '${access_key}'
  secretKey = '${secret_key}'
}

EOF

# ---- Data Preparation ----
# Use this section to copy essential files from S3 to the working directory.

# For example, copy the sample sheet and params.yml from S3 to the current working directory.
# aws s3 cp s3://nextflow-input/samplesheet.csv .
# aws s3 cp s3://nextflow-input/scripts/params.yml .

# ---- Nextflow Command Setup ----
# Important: The -c option appends the mmc config file and soft overrides the nextflow configuration.

# Assembles the Nextflow command with all necessary options and parameters.
nextflow_command='nextflow run <nextflow-pipeline> \
-r <revision-number> \
-c mmc.config \
-params-file params.yml \
--input samplesheet.csv \
--outdir 's3://nextflow-output/rnaseq/' \
-resume '

# ---------------------------------------------
# ---- vvv DO NOT EDIT BELOW THIS LINE vvv ----
# ---------------------------------------------
# The following section contains functions and commands that should not be modified by the user.

# Create side script to tag head node - exits when properly tagged
cat > tag_nextflow_head.sh << EOF
#!/bin/bash

runname="\$(cat .nextflow.log 2>/dev/null | grep nextflow-io-run-name | head -n 1 | grep -oP '(?<=nextflow-io-run-name:)[^ ]+')"
workflowname="\$(cat .nextflow.log 2>/dev/null | grep nextflow-io-project-name | head -n 1 | grep -oP '(?<=nextflow-io-project-name:)[^ ]+')"

while true; do

  # Runname and workflowname will be populated at the same time
  # If the variables are populated and not tagged it, tag the head node
  if [ ! -z \$runname ]; then
    ./float modify -j "$(echo $FLOAT_JOB_ID)" --addCustomTag run-name:\$runname 2>/dev/null
    ./float modify -j "$(echo $FLOAT_JOB_ID)" --addCustomTag workflow-name:\$workflowname 2>/dev/null
    break
  fi

  runname="\$(cat .nextflow.log 2>/dev/null | grep nextflow-io-run-name | head -n 1 | grep -oP '(?<=nextflow-io-run-name:)[^ ]+')"
  workflowname="\$(cat .nextflow.log 2>/dev/null | grep nextflow-io-project-name | head -n 1 | grep -oP '(?<=nextflow-io-project-name:)[^ ]+')"

  sleep 1s

done
EOF

# Start tagging side-script
chmod +x ./tag_nextflow_head.sh
./tag_nextflow_head.sh &

# Start Nextflow run
$nextflow_command

if [[ $? -ne 0 ]]; then
  echo $(date): "Nextflow command failed."
  exit 1
else
  echo $(date): "Nextflow command succeeded."
  exit 0
fi
Job-Submit Script Adjustments
- Modify the
process.extrawithin themmc.configsection to customize thevmPolicyfor individual nextflow processes (Default policy isspotOnlyin the job submit script. Adjust as needed e.g.,onDemand,spotFirst). You may find more options when callingfloat submit -h:
--vmPolicy [spotOnly=true,retryLimit=10,retryInterval=300s]For handling nextflow code repository, samplesheets and params-file, you have two options: download them or create them directly in the script. Here’s how to do both:
Downloading Samplesheet and Params File
- Provide download commands for users to obtain samplesheet and params file for Nextflow, ensuring you replace
<download-link>with the actual URLs:
# Download samplesheet
aws s3 cp s3://nextflow-input/samplesheet.csv .

# Download params file
aws s3 cp s3://nextflow-input/params.yml .
Creating Samplesheet and Params File Directly in the Script
- Alternatively, users can create these files directly within the script using the
catcommand as shown below.
# Create samplesheet
cat > samplesheet.csv << EOF
sample,fastq_1,fastq_2,strandedness
AL_TO_rep01,s3://nextflow-input/Sample_1_L007_R1_001.fastq.gz,s3://nextflow-input/Sample_1_L007_R2_001.fastq.gz,auto
AL_TO_rep01,s3://nextflow-input/Sample_2_L008_R1_001.fastq.gz,s3://nextflow-input/Sample_2_L008_R2_001.fastq.gz,auto
AL_TO_rep01,s3://nextflow-input/Sample_3_L014_R1_001.fastq.gz,s3://nextflow-input/Sample_3_L014_R2_001.fastq.gz,auto
AL_TO_rep01,s3://nextflow-input/Sample_4_L009_R1_001.fastq.gz,s3://nextflow-input/Sample_4_L009_R2_001.fastq.gz,auto
EOF

# Create params file
cat > params.yml << EOF
multiqc_title: "rnaseq_multiqc"
fasta: "s3://nextflow-input/reference/Caenorhabditis_elegans.WBcel235.dna.toplevel.fa.gz"
gtf: "s3://nextflow-input/reference/Caenorhabditis_elegans.WBcel235.111.gtf.gz"
save_reference: true
remove_ribo_rna: true
skip_alignment: true
pseudo_aligner: "salmon"
EOF- Download your nextflow code repository using
git cloneor copying from S3
NOTE: if using private git repositories you can export your GITHUB_TOKEN before the nextflow_command
- Finally, ensure you customize your
nextflow_commandwith specific pipeline requirements and save the changes:
nextflow_command='nextflow run <nextflow-pipeline> \
-r <revision-number> \
-c mmc.config \
-params-file params.yml \
--input samplesheet.csv \
--outdir 's3://nextflow-output/rnaseq/' \
-resume '
Remember to replace placeholders with your specific pipeline details.
Float Submit
- Login to your MMCloud opcenter:
float login -a <opcenter-ip-address> -u <user>Enter your password in the next prompt and you should see
Login succeded
- Ensure you are using the latest version of OpCenter & float CLI:
float release upgrade --sync- Make sure you have the following variables set as-is for
float secret's:
+-----------------------+
|         NAME          |
+-----------------------+
| OPCENTER_IP_ADDRESS   |
| OPCENTER_USERNAME     |
| OPCENTER_PASSWORD     |
| AWS_BUCKET_ACCESS_KEY |
| AWS_BUCKET_SECRET_KEY |
+-----------------------+- Useful
float secretcommands:
# to list stored secrets
float secret ls
# to set a secret
float secret set OPCENTER_IP_ADDRESS 192.0.1.2
# to unset a secret
float secret unset OPCENTER_IP_ADDRESS
Float Submit Command
- Replace the placeholders
<work-bucket>,<region>,<security-group>, and<job-name>with your specific values and execute the float submit command:
float submit \
--hostInit transient_JFS_AWS.sh \
--hostTerminate hostTerminate_AWS.sh \
-i docker.io/memverge/juiceflow \
--vmPolicy '[onDemand=true]' \
--migratePolicy '[disable=true]' \
--dataVolume '[size=60]:/mnt/jfs_cache' \
--dirMap /mnt/jfs:/mnt/jfs \
-c 2 -m 4 \
-n <job-name> \
--securityGroup <security-group> \
--env BUCKET=https://<work-bucket>.s3.<region>.amazonaws.com \
-j job_submit_AWS.sh
Here's a brief explanation of the parameters used in the float submit command:
| Parameter | Brief Description |
|---|---|
--hostInit transient_JFS_AWS.sh |
Shell script to run on the host before the job starts. |
--hostTerminate hostTerminate_AWS.sh |
Shell script to run on the host after the job has been cancelled |
-i docker.io/memverge/juiceflow |
Docker image for the job's software environment. |
--vmPolicy '[onDemand=true]' |
Uses on-demand VM instance for head-node execution. |
--migratePolicy '[disable=true]' |
Disables head-node migration to different hosts/VMs. |
--dataVolume '[size=60]:/mnt/jfs_cache' |
Attaches a 60GB data volume at /mnt/jfs_cache in the container. |
--dirMap /mnt/jfs:/mnt/jfs |
Maps a host directory to a container directory for data sharing. |
-c 2 |
Allocates 2 CPU cores to the job. |
-m 4 |
Allocates 4GB of memory to the job. |
-n <job-name> |
Assigns a name to the job for identification. |
--securityGroup <security-group> |
Applies a security group to the job's VM for network rules. |
--env BUCKET=https://<work-bucket>.s3.<region>.amazonaws.com |
Sets an environment variable for the S3 bucket URL. |
-j job_submit_AWS.sh |
Specifies the job script or command to run inside the container. |
Float Submit Script
- To simplify job submission, create a shell submit script named
submit_nf_float_job.shwith the float submit command shown above
JOB_SCRIPT=$1
JOB_NAME=$2
JUICEFS_BUCKET=$3
PREVIOUS_JOB_ID=$4

if [ -z "$JOB_SCRIPT" ]; then
    echo "JOB_SCRIPT is not set"
    exit 1
fi

if [ -z "$JOB_NAME" ]; then
    echo "JOB_NAME is not set"
    exit 1
fi

if [ -z "$JUICEFS_BUCKET" ]; then
    echo "JUICEFS_BUCKET is not set"
    exit 1
fi

if [ -z "$PREVIOUS_JOB_ID" ]; then
    SHOULD_RESUME=""
else
    SHOULD_RESUME="--env PREVIOUS_JOB_ID="$PREVIOUS_JOB_ID
fi


float submit \
    --hostInit transient_JFS_AWS.sh \
    --hostTerminate hostTerminate_AWS.sh \
    -i docker.io/memverge/juiceflow:v2 \
    --vmPolicy '[onDemand=true]' \
    --migratePolicy '[disable=true]' \
    --dirMap /mnt/jfs:/mnt/jfs \
    --dataVolume '[size=60]:/mnt/jfs_cache' \
    -c 4 -m 8 \
    --securityGroup <security-group> \
    --env BUCKET=https://${JUICEFS_BUCKET}.s3.<s3-bucket-region>.amazonaws.com \
    $SHOULD_RESUME \
    -n $JOB_NAME \
-j $JOB_SCRIPT- Submit command
./submit_nf_float_job.sh <job-submission-script.sh> <job-name> <s3-bucket-name>- Submit command to resume with previous job-id
./submit_nf_float_job.sh <job-submission-script.sh> <job-name> <s3-bucket-name> <previous-job-id>Mounting S3 buckets as Data Volumes
- you can mount the input data bucket using S3FS as a data volume on the Nextflow head node and worker nodes as follows:
--storage <storage-name>- Read more on Juiceflow Performance Optimization
Important Considerations
- JuiceFS Bucket Requirements: JuiceFS requires formatting at the root level of a storage bucket. It cannot be formatted on a sub-directory within a bucket. Ensure the root directory of the bucket, or the entire bucket, is specified in the command line interface (CLI) command.
Cancelling a Running Workflow to Resume Later
There are many circumstances where you might need to cancel a running Nextflow workflow and resume it later using Nextflow's -resume feature, such as changes to the configuration or resource specifications.
-
To cancel a workflow in the JuiceFlow setup, cancel the head node job. This will cause the head node host to generate a
<JOB_ID>.meta.json.gz, where the JOB_ID represents the job-id of the head node file in the S3 work bucket. -
You can find the
<JOB_ID>.meta.json.gzand the status of metadata dump in thejob.eventslog inAttachmentsof the head node job -
This
<JOB_ID>.meta.json.gzfile is critical for restoring the work directory for subsequent attempts using the environmental variablePREVIOUS_JOB_ID.
Resuming Workflows with the Job-Submit Script
JuiceFlow supports the -resume option with Nextflow. Each workflow execution generates a <JOB_ID>.meta.json.gz file in the S3 work bucket. This file is critical for restoring the work directory for subsequent attempts using the environmental variable PREVIOUS_JOB_ID .
Example command
float submit \
--hostInit transient_JFS_AWS.sh \
--hostTerminate hostTerminate_AWS.sh \
-i docker.io/memverge/juiceflow \
--vmPolicy '[onDemand=true]' \
--migratePolicy '[disable=true]' \
--dataVolume '[size=60]:/mnt/jfs_cache' \
--dirMap /mnt/jfs:/mnt/jfs \
-c 2 -m 4 \
-n <job-name> \
--securityGroup <security-group> \
--env PREVIOUS_JOB_ID=<PREVIOUS_JOB_ID> \
--env BUCKET=https://<work-bucket>.s3.<region>.amazonaws.com \
-j job_submit_AWS.sh
Monitoring on OpCenter
Workflow Execution Log
To monitor workflow execution and get a detailed view of each process in the Nextflow workflow:
- Click on the
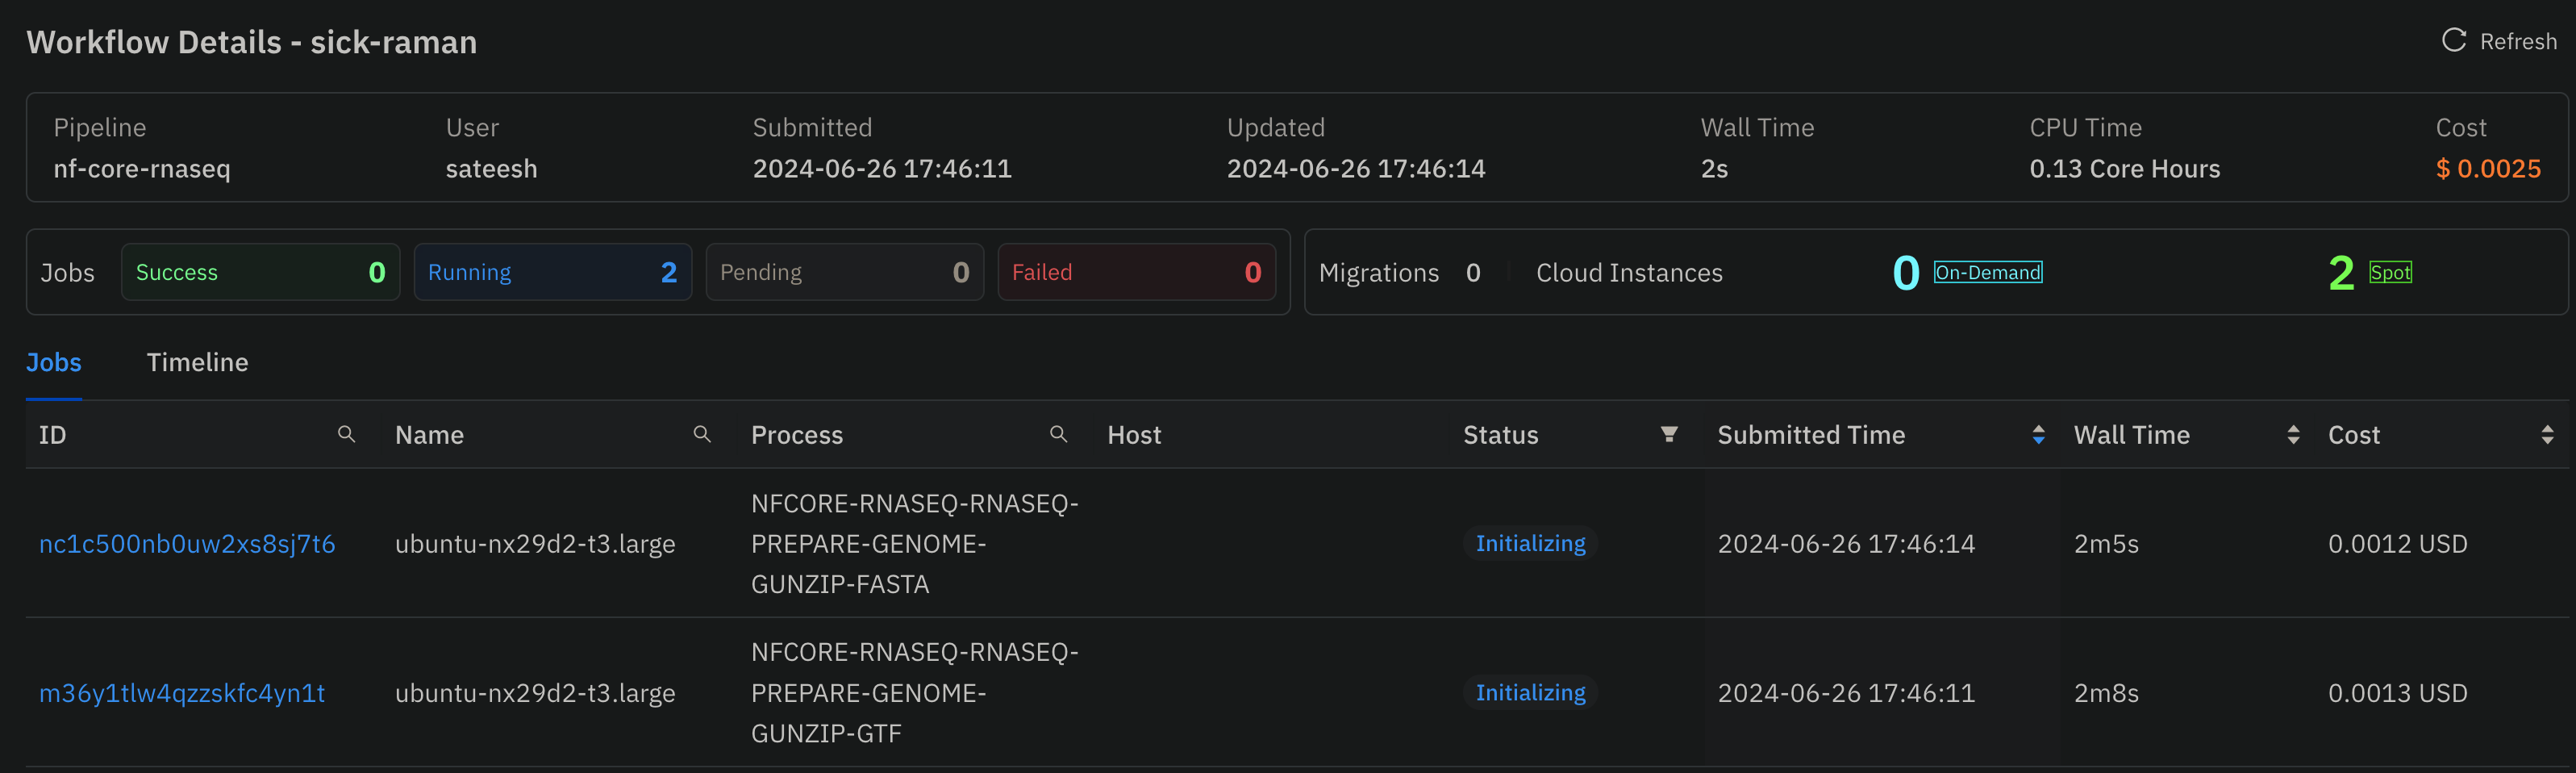
Workflowsdashboard in the OpCenter to monitor workflow execution and get a detailed view for each process in the Nextflow workflow:

- Click on the workflow name, and you can monitor the jobs running in this workflow in this consolidated view:
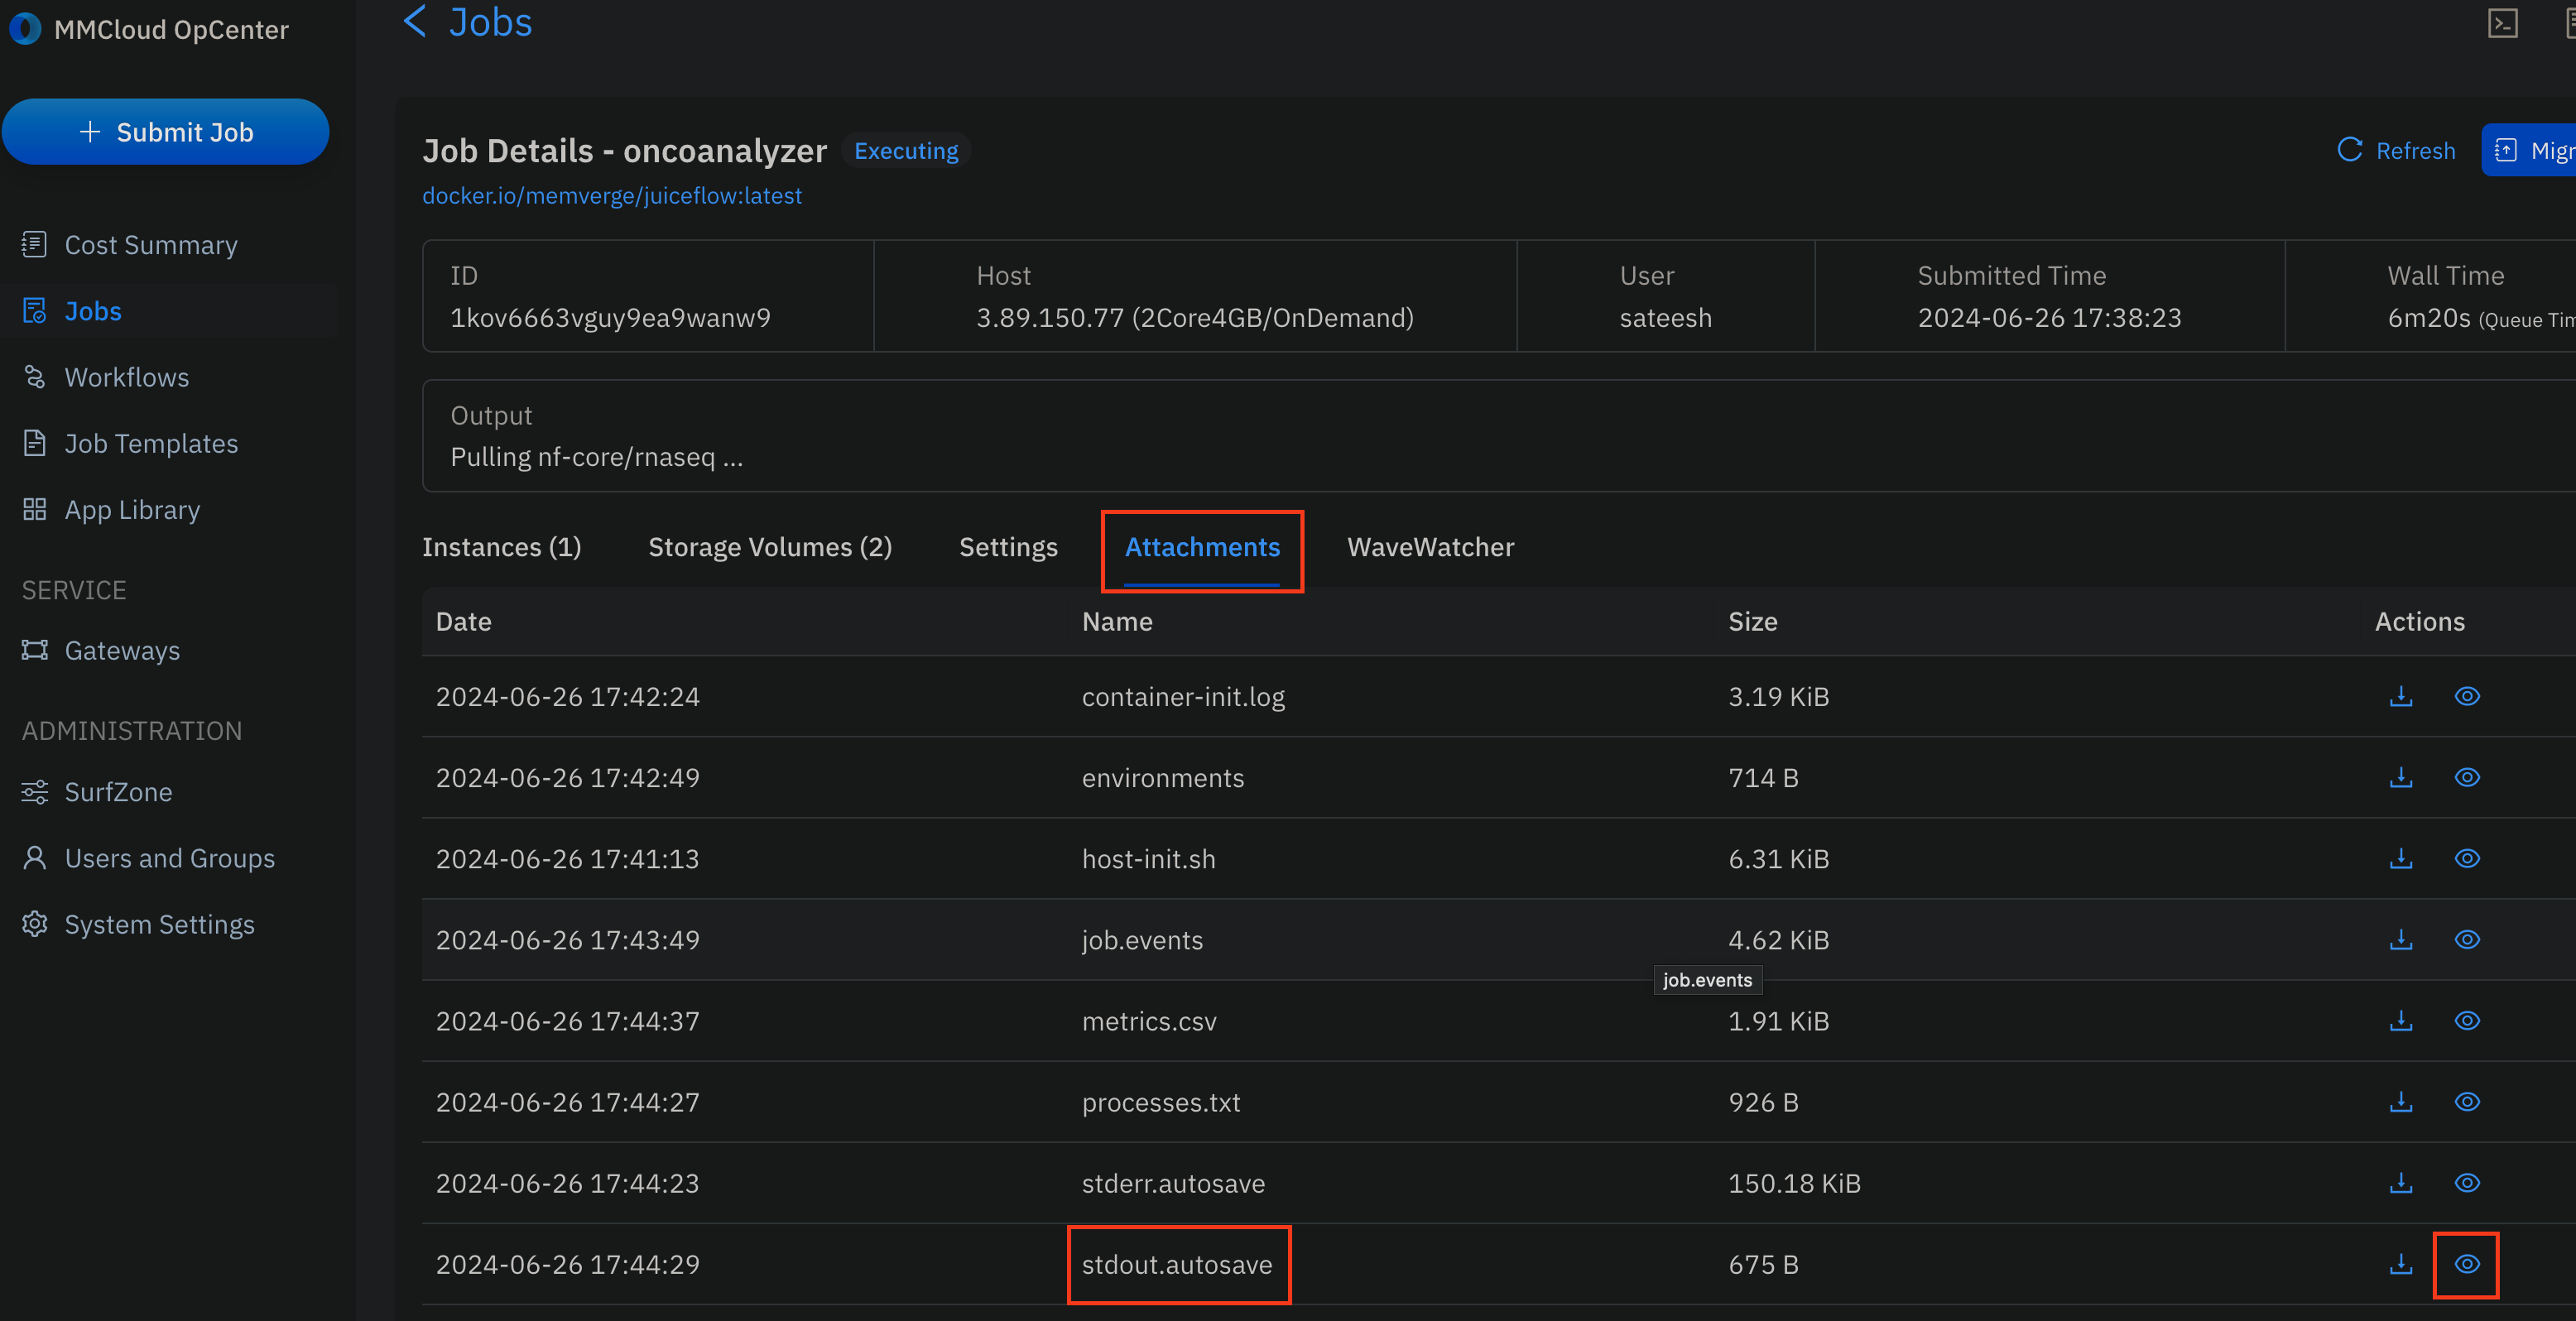
- Once the head-node job starts
Executing, you can monitor the Nextflow stdout by clicking on the job ->Attachments->stdout.autosave:
Individual Job Logs
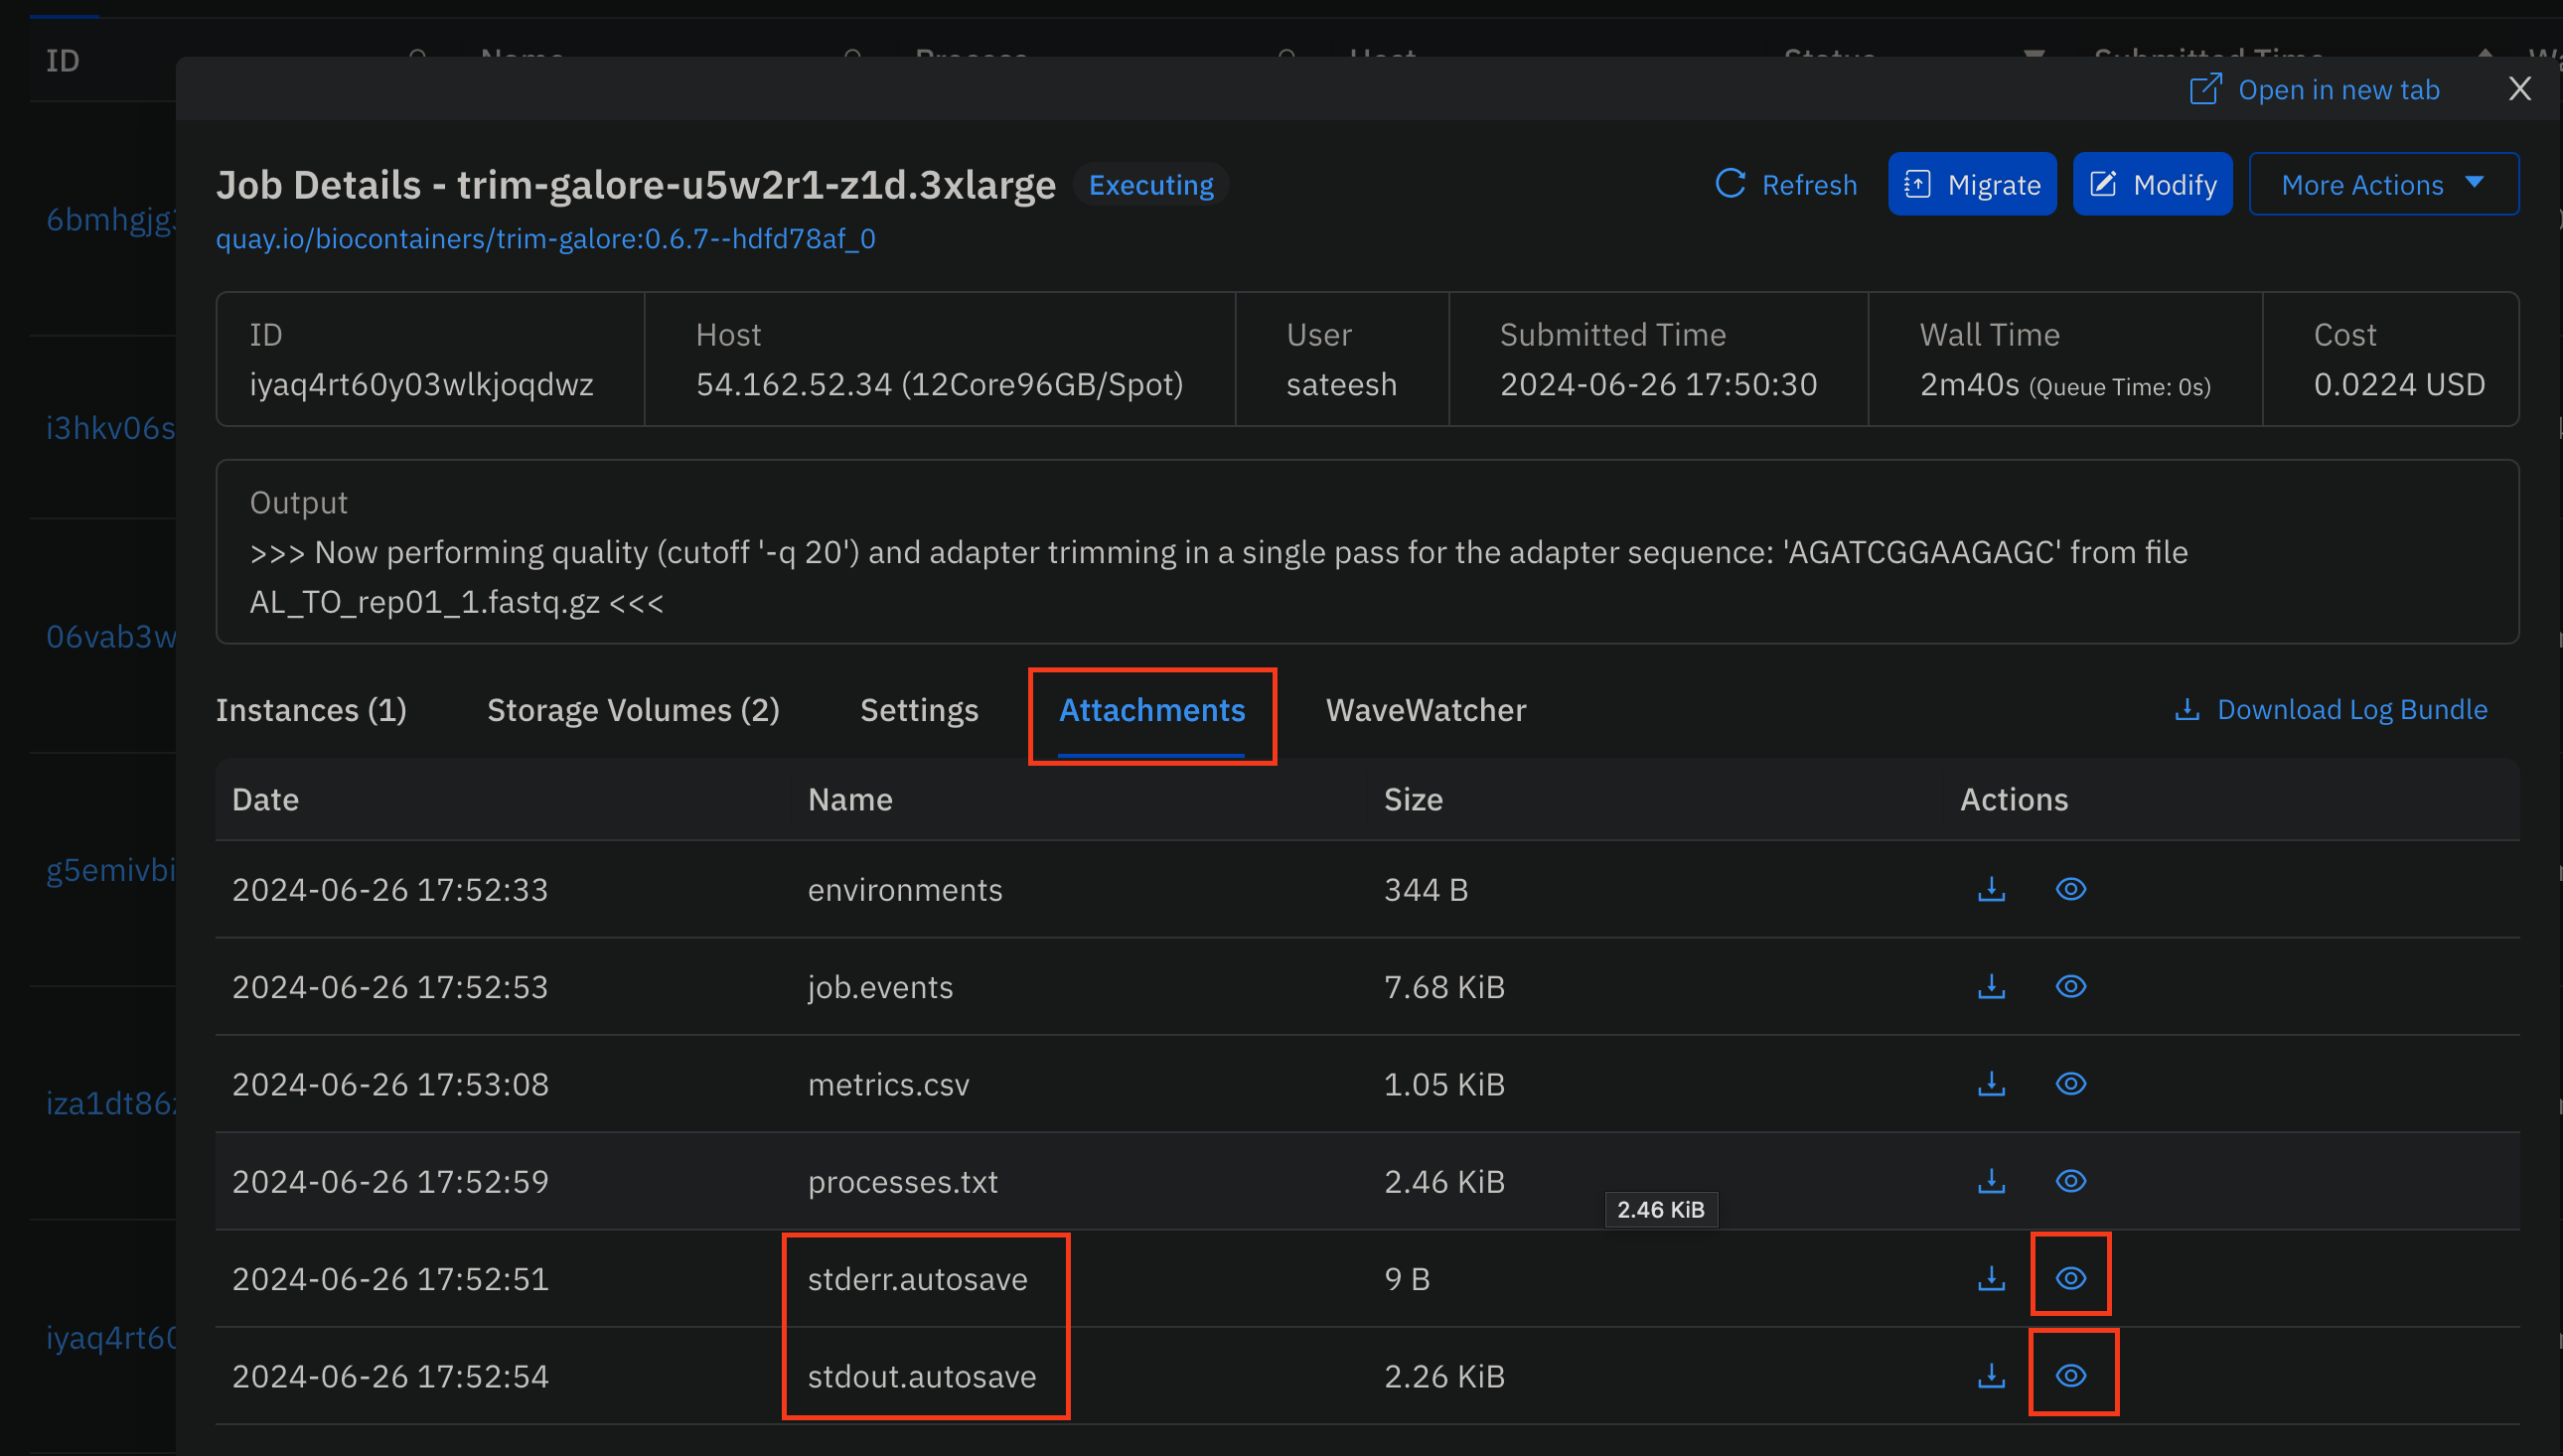
To view the execution log of any particular job:
- Click on the Job-ID.
- Navigate to the
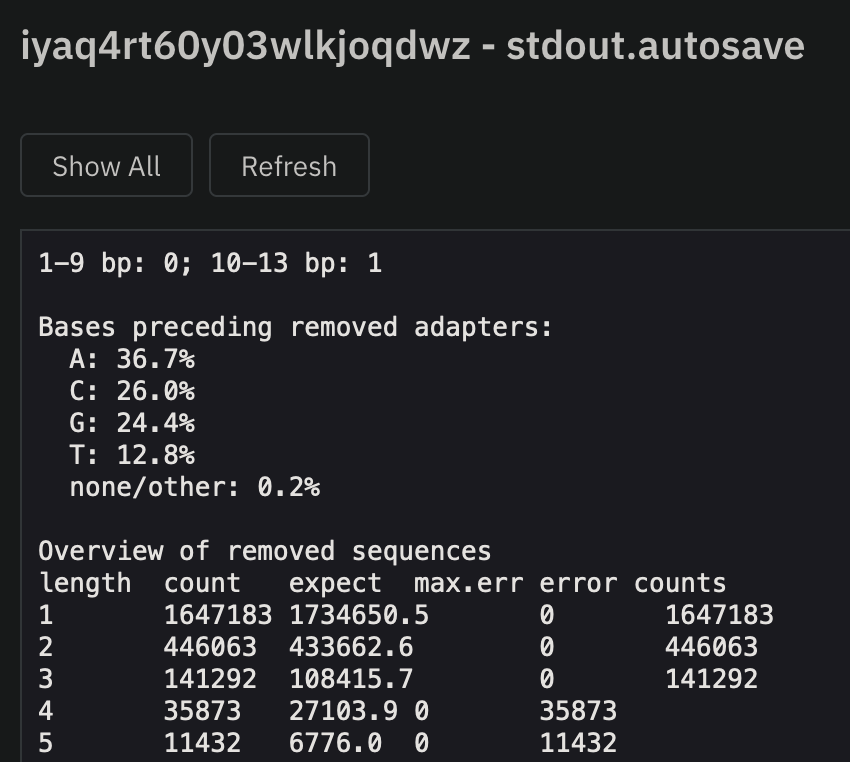
Attachmentstab. - Click
view(eye-icon) on thestdout.autosavefile.
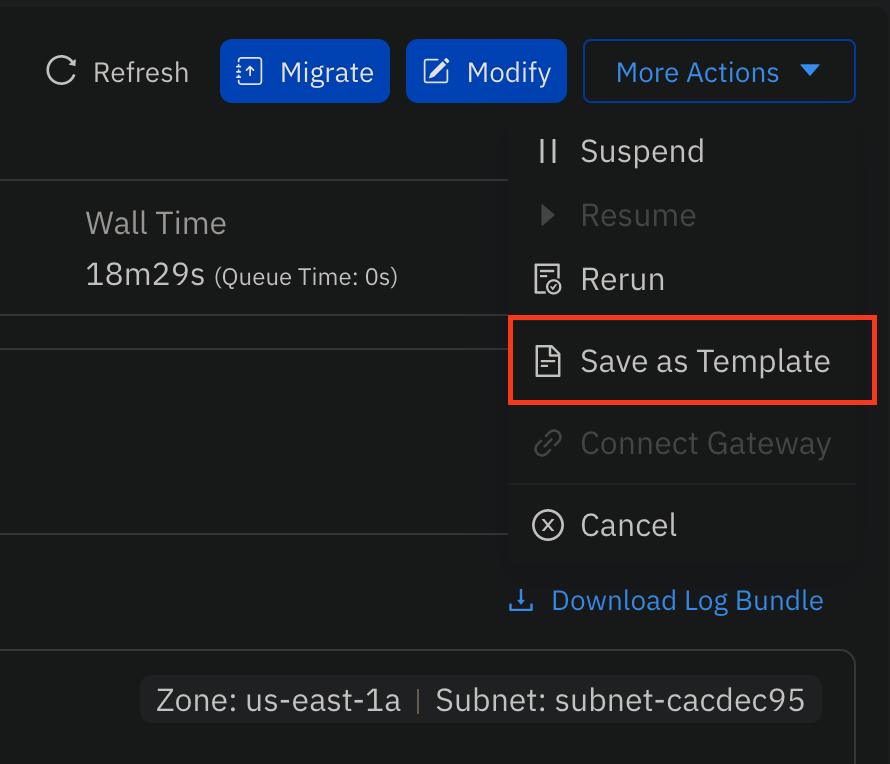
Create Job Templates to Launch via MMCLoud GUI
Job Templates allow for the ease and customaization of runs that follow a similar format, without having the need to manually set up a command every time. It requires the submission of one job first.
- From the
Jobsdashboard, select the head node job previously submitted above and click onMore Actions->Save as Template:
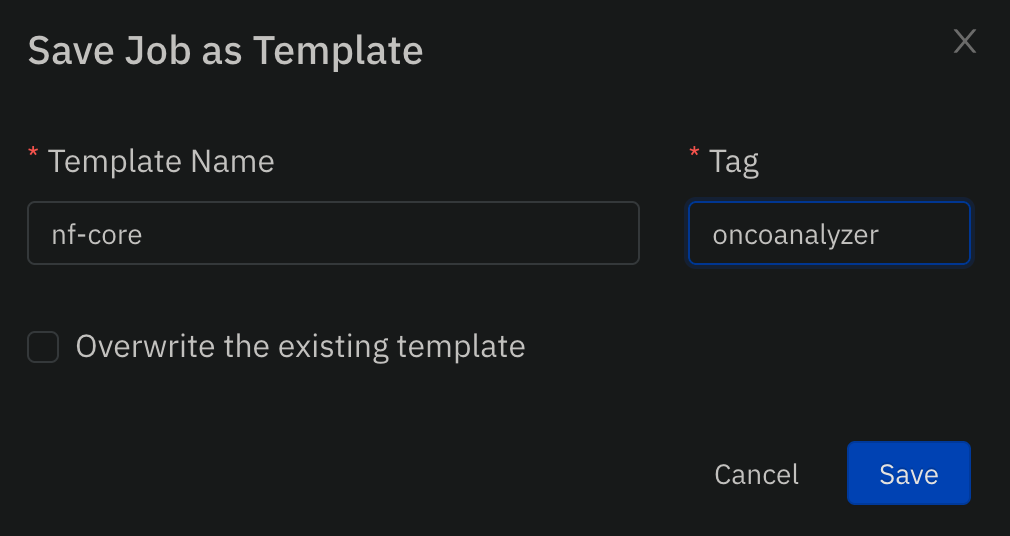
- Provide a name and tag for the private template:
- Navigate to the
Job Templatesdashboard and click onPrivatetemplates:
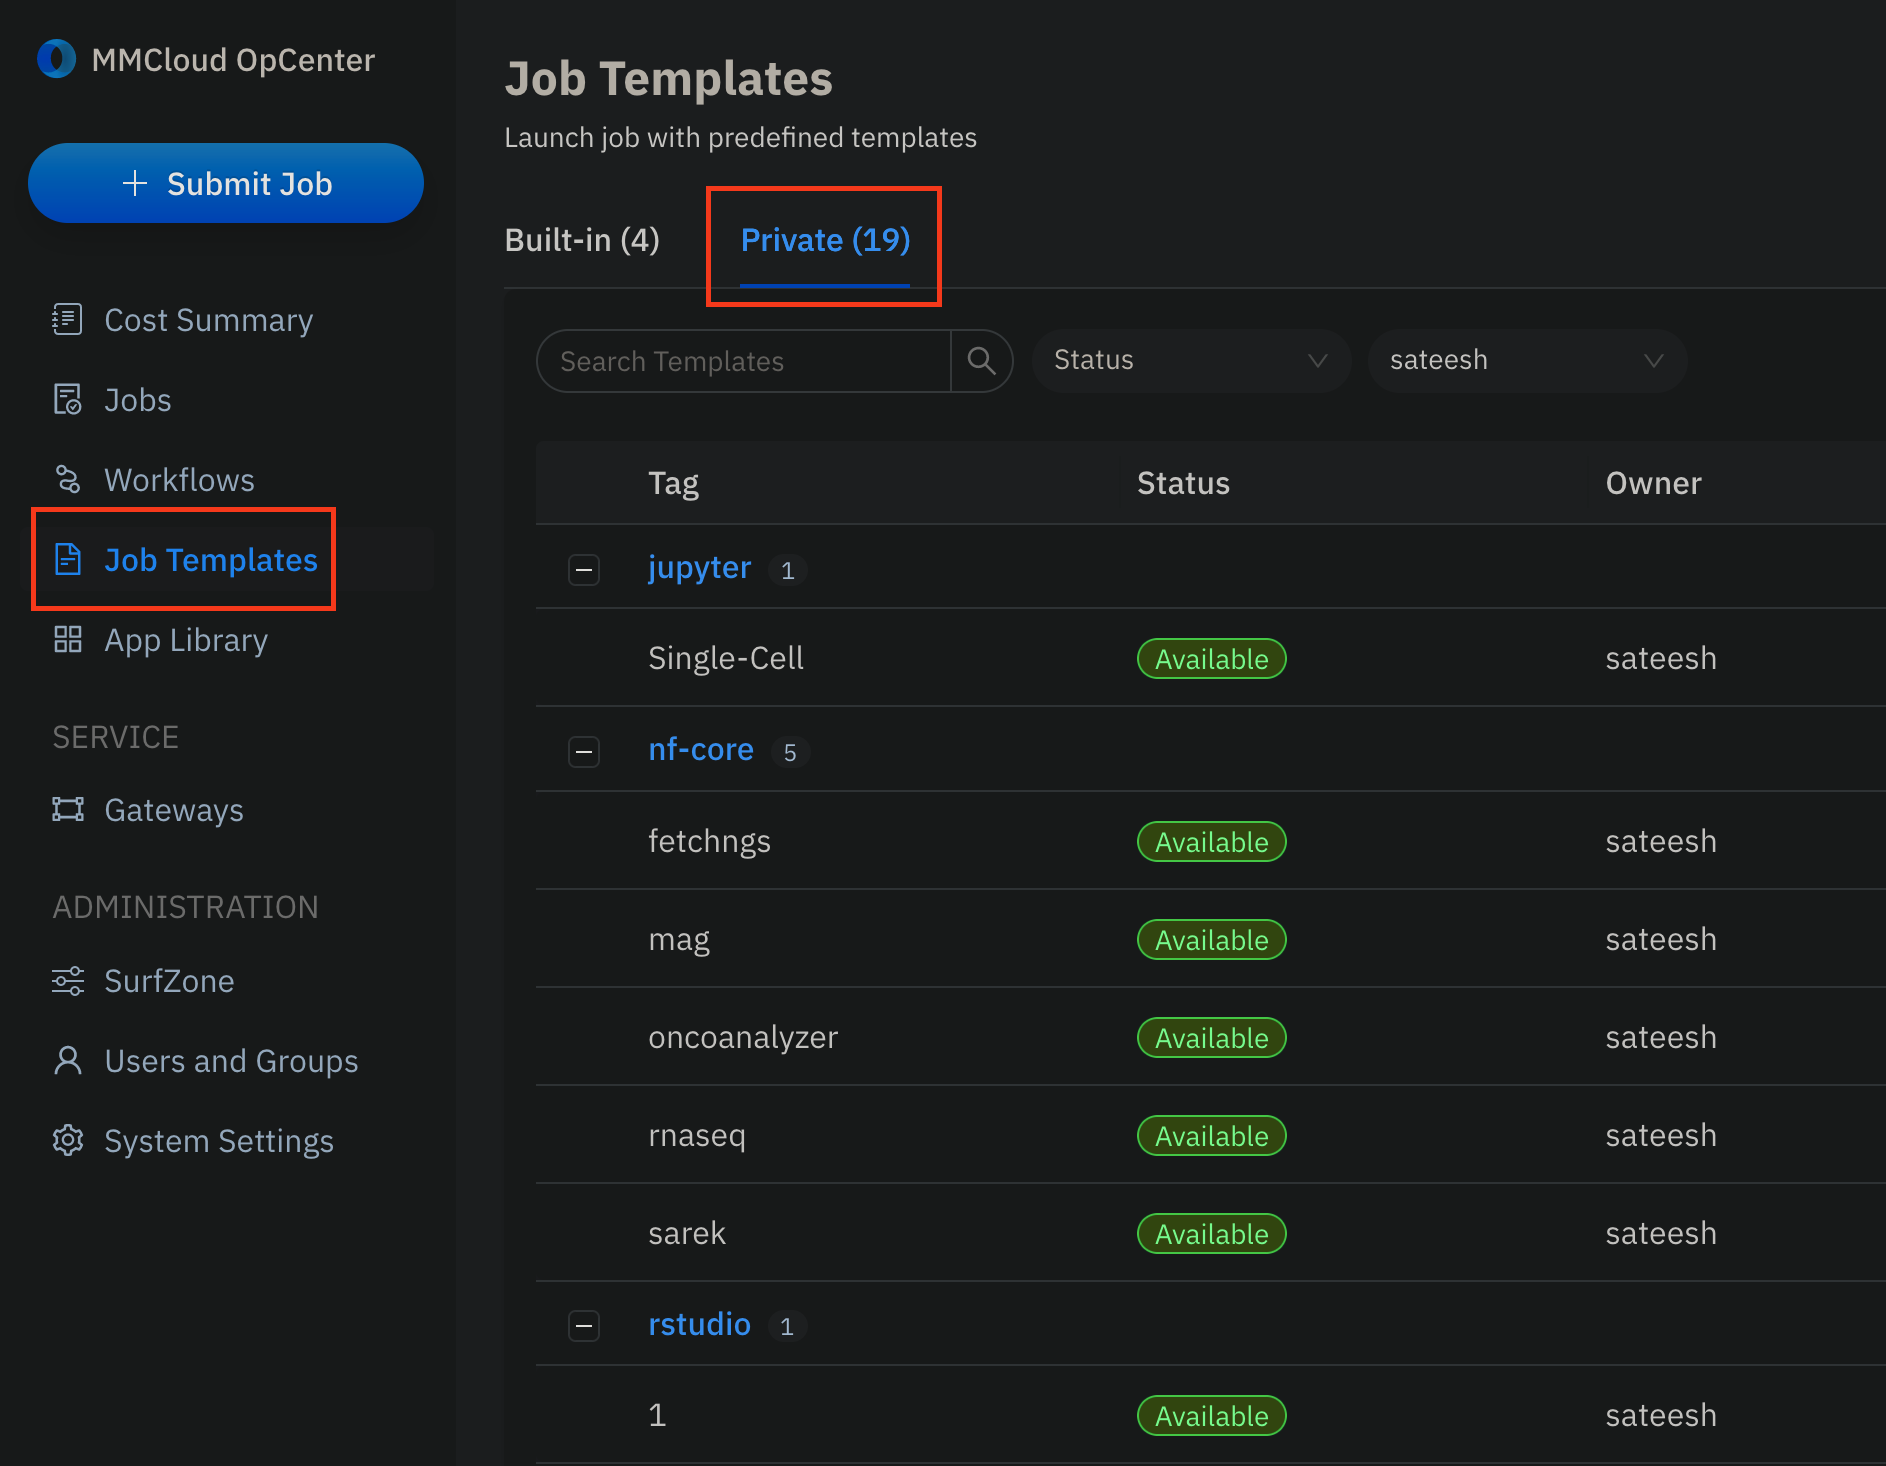
- You can click on any job template, edit/change samplesheet, variables etc., and submit new jobs from the GUI.
- Users can also submit jobs from templates via CLI
float submit --template private::<template-name>:<template-tag> \
-e BUCKET=s3://<aws-jfs-bucket>
Addtionally, please keep in mind the features that need to be updated with every run if they deviate from the default values provided in the private template. This will mainly include:
- S3 Bucket URL
- Updating of the nextflow run command in the job script