Deploying MMCloud OpCenter in AWS Non-default VPC
By Hui Chen, Yuchen Liu, Jing Gong
When EC2 resources are provisioned for the first time in an AWS account, a Default VPC is created automatically. In the default VPC, an Internet gateway and public subnets with corresponding routing tables are pre-configured; a public IP address are assigned to VMs by default; and access to the Internet is enabled automatically. As such, deploying MMCloud OpCenter in AWS default VPC is straightforward if the security posture of the default VPC is acceptable. However, in enterprise environments, it is often advantageous and/or necessary to run MMCloud workloads in a dedicated non-default VPC. Such set up allows granular security enforcement and ensures that MMCloud does not affect production environments.
Deploying MMCloud OpCenter in a non-default VPC requires careful planning so as to ensure proper communication between the various MMCloud components. In a non-default VPC, customers may have both public IP subnets and private IP subnets. Public IP assignment normally is disabled for VMs, and most likely access to the internet will be disabled in the private subnets. For this kind of environment some extra cloud services need to be configured for MMCloud to work properly.
This document presents the procedure on how to deploy MMCloud OpCenter in AWS using a dedicated non-default VPC with typical enterprise security restrictions:
Step 1: Create VPC for MMCloud
From VPC dashboard, click on VPCs, then select Create VPC. Configure VPC settings as follows:
1.1 Resources to create: select VPC and more.
1.2 Name tag auto-generation: keep Auto-generate default set to be enabled; input a customized name tag.
1.3 IPv4 CIDR block: set the CIDR block addresses for the VPC.
1.4 IPv6 CIDR block: keep the default selection for No IPv6 CIDR block.
1.5 Tenancy: keep Default.
1.6 Number of Availability Zones (AZs): select 2 so as for the high availability.
1.7 Number of public subnets: select 2.
1.8 Number of private subnets: select 2 or 4 according to your needs.
1.9 NAT gateways ($): make selection according to your needs, None by default.
1.10 VPC endpoints: select S3Gateway.
1.11 DNS options: keep the default settings for Enable DNS hostnames and Enable DNS resolution.
1.12 Click on Create VPC to create a new nondefault VPC.

Step 2: Deploy MMCloud OpCenter in a public subnet of the newly created VPC.
Follow Quick Start Deploy MMCloud OpCenter on AWS to set up the MMCloud in a public subnet of the VPC created at Step 1.
This step allows users to access OpCenter from the public Internet, and allows OpCenter to communicate with the MMCloud License Server over the Internet.
Step 3: Create EC2 endpoints for private subnets.
This step allows the OpCenter as well as the MMCloud worker nodes to access AWS services.
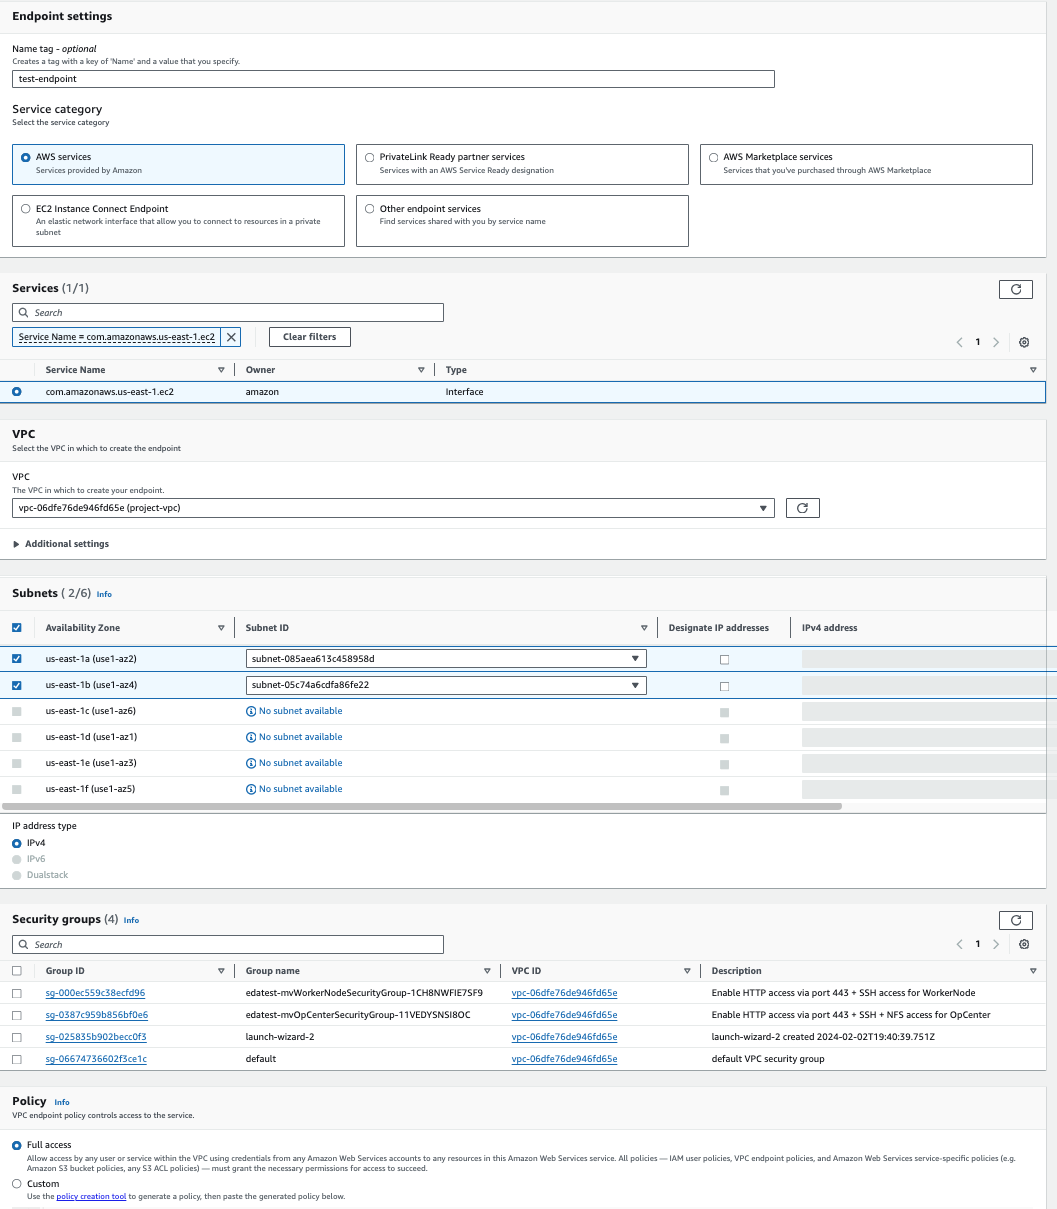
From VPC dashboard, click on Endpoints, then select Create endpoint. Configure Endpoint settings as follows:
3.1 Name tag: input a customized name tag.
3.2 Service category: click on AWS services; search AWS service name of EC2 service, select it for the endpoint service.
3.3 VPC: select the VPC created at Step 1 as the VPC in which to create your endpoint.
3.4 Subnets: for all the availability zones in the VPC, select the private subnet IDs.
3.5 IP address type: keep the default IPv4 setting.
3.6 Security groups: select default group and two more security groups created for your MMCloud OpCenter and WorkerNodes.
3.7 Policy: Keep default Full access selection.
3.8 Tags: keep the default setting.
3.9 Click on Create endpoints to create a new EC2 instance endpoint. Wait until the status of the endpoint be fully ready.
3.10 Open OpCenter GUI. ((It may take several minutes for opcenter to be ready.)

If a worker node needs to access Internet resources, you may need to create a NAT gateway. This is not necessary if a worker node only needs to access AWS services.